How to Make a Photo Mosaic from Your Instagram Photos (Step-by-Step)
A step-by-step tutorial for turning your Instagram archive into a photo mosaic. How to download every photo, organise them, and generate a mosaic from years of your feed.
Posted by
Related reading
Heart-Shaped Photo Mosaic: How to Make One for Valentine's, Anniversary or Engagement
A tutorial for creating a heart-shaped photo mosaic from your photos. Step-by-step guide for Valentine's Day, anniversaries, engagements, weddings, and any romantic gift.
Photo Mosaic Poster: Sizes, DPI & How to Print One That Looks Sharp
A complete guide to making a photo mosaic poster. Recommended sizes, DPI requirements, where to print, and how to keep the close-up tile reveal sharp at any size.
Mother's Day Photo Mosaic: The Gift Built from Every Family Photo
A step-by-step guide to making a Mother's Day photo mosaic from family photos. Ideas for kids, partners, and grown children, plus tips on gathering photos and printing in time.
Why Instagram is a near-perfect mosaic tile pool
If you have used Instagram for more than a year, you have a curated photo album with hundreds of square images, all cropped and colour-corrected, all already meaningful enough that you posted them. That is exactly what a photo mosaic algorithm wants. Square aspect ratio, good colour variety, and zero need to filter out garbage. The Instagram archive is often the easiest tile pool you will ever assemble.
This tutorial walks through the full workflow: download, sort, choose a main image, generate, print. About 15 minutes of active work plus the wait for Instagram to email you the archive.
Step 1: Download your Instagram archive
Instagram lets you download a complete archive of every photo you have posted. The export is free and arrives in your inbox as a zip file.
- Open Instagram on the web at instagram.com.
- Click your profile picture, then Settings and activity, then Your information and permissions, then Download your information.
- Choose "Download or transfer information" and select your account.
- Pick "Some of your information" and select Posts (and optionally Stories and Reels).
- Choose Download to device, set the date range to "All time", and pick High for media quality.
- Submit. Instagram will email a download link within 1 to 48 hours.
The zip file contains a folder of all your posted photos as JPGs, named by date. Unzip it somewhere easy to find.
Step 2: Sort the archive into a tile pool

The unzipped archive will contain hundreds or thousands of photos. A few quick filters before you upload to a mosaic tool:
- Delete pure-text and screenshot posts. These tile poorly. Keep only photographs.
- Group by theme if you want a themed mosaic. Travel, family, food, pets. Each theme can become its own mosaic if you have enough photos.
- Aim for 300 to 1,500 photos. More is better. Fewer than 200 will show repetition in print.
- Resize if needed. Most tools accept up to 4MP per tile. Bigger files take longer to upload but do not improve the result.
Step 3: Pick a main image
The main image is the picture the mosaic looks like from across the room. For an Instagram-sourced mosaic, three options work well:
- Your most-liked Instagram photo. A natural choice. The photo you and your followers liked best.
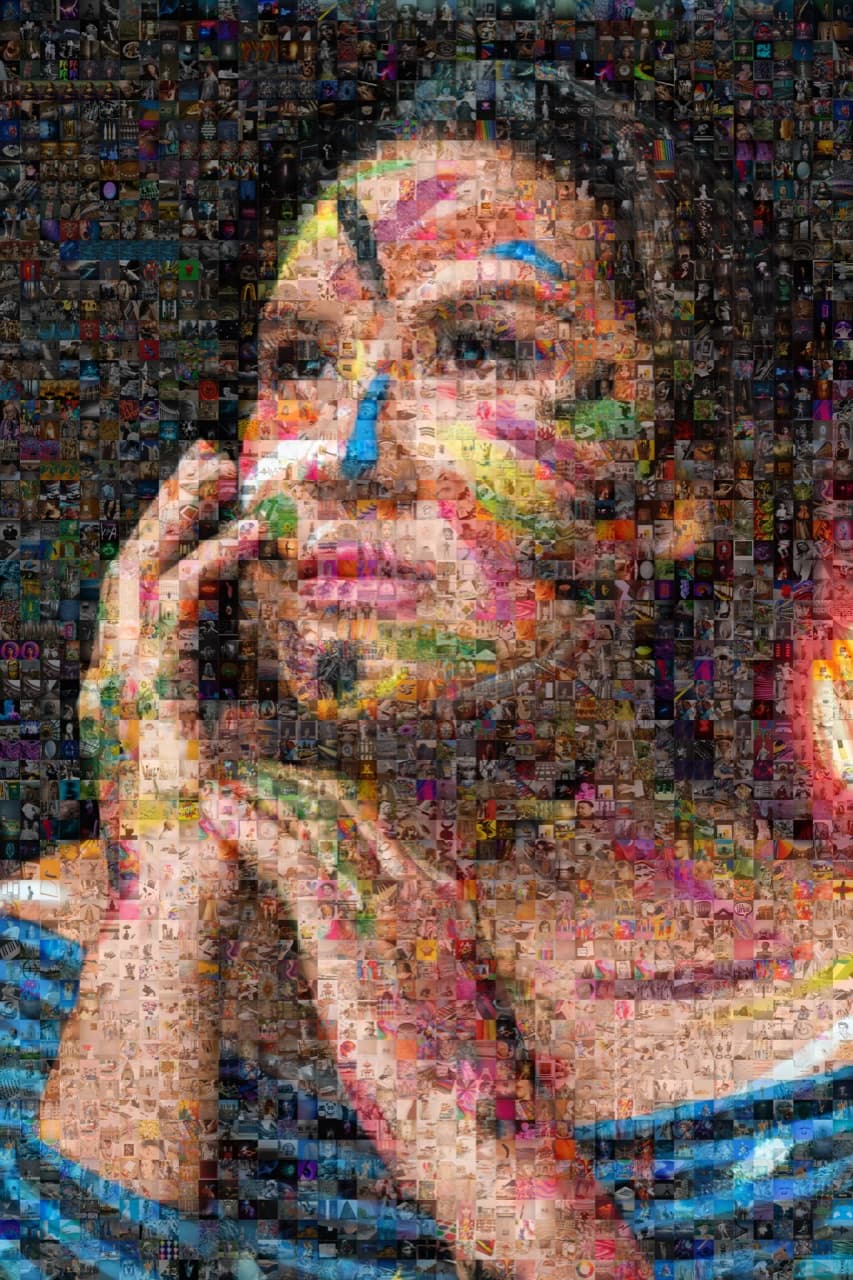
- A current portrait or selfie. Tiled with years of your feed, the close-up reveal becomes a visual biography.
- Your handle, in bold letters. Typographic. Good for a profile-page banner or a printed poster.
Whichever you pick, use a high-resolution version. The cropped Instagram square is fine, but if the original raw photo is in your camera roll, use that instead.
Ready to make your own photo mosaic?
PicTiler turns your photos into a high-resolution mosaic in minutes. Upload a main image, drop in your gallery, and download a print-ready file. No watermarks on free previews and unlimited tweaks until you love the result.
Try PicTiler freeStep 4: Generate the mosaic in PicTiler
- Open PicTiler and start a new project.
- Upload the main image you chose.
- Drag the entire Instagram tile folder into the gallery upload. PicTiler will accept the whole folder at once.
- Generate the preview. Tweak grid density (more tiles for more detail), colour blending (a small overlay makes the main image read instantly), and tile repetition.
- Export at the size you plan to print. For a 24x36 inch poster at 300 DPI, that is 7,200 by 10,800 pixels.
Step 5: Print, frame, or post
What you do with the file depends on the goal:
- Frame it. A 16x24 inch framed mosaic over a desk is the most common use. Years of your feed in one piece of art.
- Canvas wrap. A 24x36 canvas above a couch. Conversational, gallery-style.
- Post it back to Instagram. A meta move, but the close-up reveal works on a phone too. Cap it at a square crop for the feed.
- Gift it. A mosaic of someone's Instagram archive is one of the most personal gifts you can give a heavy poster. Tag-search their account on web archives if you do not have direct access.
Mosaic ideas using your Instagram archive
- Year-in-review mosaic. Use one year of Instagram as the tile pool, an end-of-year self-portrait as the main image.
- Travel mosaic. Filter the archive to only travel photos. Use a favourite trip photo as the main image.
- Food mosaic for a chef or home cook. Every meal you posted, tiled into a portrait or a typographic recipe card.
- The decade-of-Instagram mosaic. Ten years of posts as a single mosaic for a 30th, 40th, or 50th birthday.
- The couple mosaic. Combine both partners' archives into one tile pool. Couple portrait as the main image.
Final thoughts
Instagram is the easiest tile pool you will ever assemble for a photo mosaic. It is already curated, already square, and already organised by date. The hardest part is requesting the archive download. Once it arrives, you are 15 minutes from a print-ready mosaic of your last decade.
Ready to make your own photo mosaic?
PicTiler turns your photos into a high-resolution mosaic in minutes. Upload a main image, drop in your gallery, and download a print-ready file. No watermarks on free previews and unlimited tweaks until you love the result.
Try PicTiler free